Contouring face makeup has gained immense popularity, thanks to its ability to create a flawless and chiseled appearance. In the world of makeup, contouring has emerged as a transformative technique, allowing individuals to sculpt and enhance their facial features. Whether you’re a makeup enthusiast or someone looking to accentuate your best features, understanding the art of contouring is essential. This article will provide a comprehensive guide to contouring face makeup, from tools and techniques to common mistakes and expert tips.
What is Contouring Face Makeup?
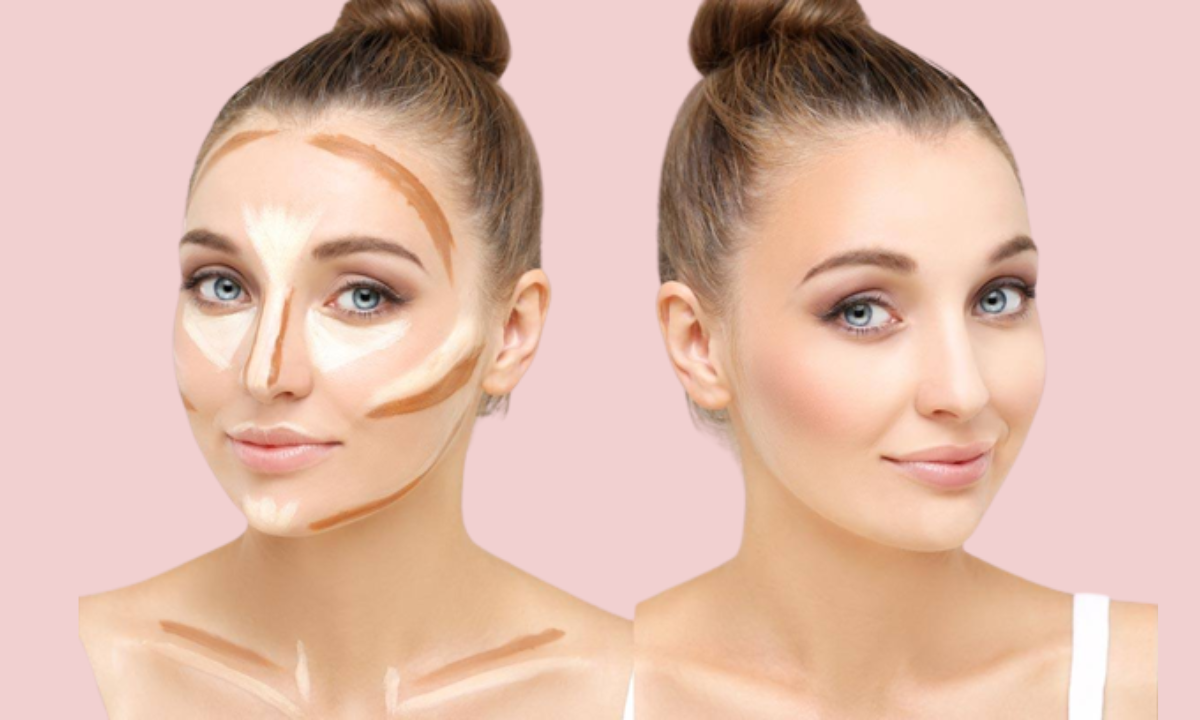
Contouring face makeup involves the use of shading and highlighting techniques to create dimension and shape to your face. By strategically applying darker shades to areas you want to minimize and lighter shades to areas you want to emphasize, contouring helps define your facial structure. This makeup technique is especially useful for sculpting cheekbones, slimming the nose, defining jawlines, and even reshaping the face to a certain extent.
Tools and Products for Contouring
To achieve a flawless contour, it’s essential to have the right tools and products at your disposal. Here are the key items you’ll need:
Contouring Brushes
Investing in high-quality contour brushes is crucial for achieving precision and seamless blending. Look for brushes specifically designed for contouring, such as angled brushes for targeted application and blending brushes for seamless transitions.
Contouring Palette or Powder
A contouring palette or powder is the cornerstone of your contouring routine. Opt for shades that are one to two shades darker than your natural skin tone for shading and shades one to two shades lighter for highlighting. Cream or powder-based products can be used, depending on your preference and skin type.
Highlighters
Highlighters are essential for adding luminosity and bringing forward the areas you want to accentuate. Choose highlighters with a subtle shimmer or glow that complements your skin tone.
Setting Powder
To ensure longevity and prevent smudging, a setting powder is essential. Opt for a translucent powder to set your contour and keep it in place throughout the day.
Step-by-Step Guide to Contouring
Achieving a professional-looking contour requires a systematic approach. Follow these steps for a perfect contour:
Prepping the Face
Before starting your makeup routine, ensure your face is clean and well-moisturized. Apply a primer to create a smooth canvas and help the makeup adhere better.
Choosing the Right Shade
Selecting the correct shade for your contour is crucial. Identify your skin’s undertone and choose contour shades that match accordingly. Warm undertones work best with warm-toned contours, while cool undertones pair well with cool-toned contours.
Highlighting and Contouring Techniques
Begin by applying the darker contour shade to the areas you want to sculpt, such as the hollows of the cheeks, temples, jawline, and sides of the nose. Use light, feathery strokes to ensure a natural appearance. Next, apply the lighter highlight shade to areas you want to bring forward, such as the bridge of the nose, cheekbones, brow bone, and cupid’s bow.
Blending and Buffing
Blending is the key to achieving a coherent contour. Use a blending brush or sponge to blend the contour and highlight shades, ensuring there are no harsh lines or visible demarcations. Blend in upward and outward motions for a natural gradient effect.
Common Mistakes to Avoid
While contouring can be a game-changer, it’s essential to be aware of common mistakes to avoid any faux pas. Here are some mistake to steer clear of:
- Overdoing the Contour: Applying too much contour can result in an unnatural or muddy appearance. Start with a light hand and build up gradually to achieve your desired intensity.
- Choosing the Wrong Shades: Selecting shades that are too dark or too light for your skin tone can create an unflattering contrast. Ensure the contour shades blend seamlessly with your natural skin tone.
- Skipping Blending: Blending is crucial to achieving a seamless contour. Neglecting this step can result in harsh lines and an uneven finish.
Contouring for Different Face Shapes
Different face shapes require different contouring techniques to enhance their features. Here are some tips for contouring based on common face shapes:
Oval Face
Oval faces are well-balanced and versatile, requiring minimal contouring. Focus on lightly shading the hollows of the cheeks and temples to add subtle definition.
Round Face
To create the illusion of angles and length, contour the outer edges of the face, including the jawline and temples. Blend well to avoid any harsh lines.
Square Face
Soften the sharp angles of a square face by contouring the jawline, temples, and forehead. Highlight the center of the face to draw attention to the features.
Heart-Shaped Face
Contour the sides of the forehead and temples to balance the width of the forehead. Lightly shade the hollows of the cheeks to soften the face’s pointy chin.
Diamond Face
Focus on contouring the temples and jawline to minimize the width of the face. Highlight the cheekbones and center of the forehead to enhance the features.
Contouring for Day and Night Looks
Contouring techniques can vary depending on the occasion and desired intensity. For daytime looks, opt for a more natural contour with subtle shading and highlighting. For nighttime looks or special occasions, you can amp up the contour for a more dramatic effect.
Contouring Tips and Tricks
To elevate your contouring game, consider the following expert tips and tricks:
- Less is More: Start with a light hand and build up the force gradually. It’s not difficult to add more product than to remove excess.
- Consider Lighting: Contouring should be tailored to the lighting conditions you’ll be in. What looks subtle in natural light may appear more intense under bright artificial lights.
- Blend, Blend, Blend: Blending is key to achieving a seamless contour. Take your time to blend the shades thoroughly for a natural and flawless finish.
- Experiment with Techniques: Explore different contouring techniques, such as draping (contouring with blush) or baking (setting the contour with powder), to find what works best for you.
How to Remove Contouring Makeup
At the end of the day, it’s essential to remove your contouring makeup effectively. Follow these steps for gentle and thorough makeup removal:
- Use a Makeup Remover: Start by using a gentle makeup remover, such as micellar water or cleansing oil, to dissolve and lift the makeup.
- Cleanse the Skin: Follow up with a gentle cleanser to remove any residue and impurities from the skin.
- Moisturize: Finish off by moisturizing your skin to replenish hydration and maintain its health.
Enhancing Your Contoured Look with Other Makeup
Contouring can be complemented with other makeup techniques to create a cohesive and polished look. Consider incorporating the following:
- Blush: Apply a subtle blush to the apples of your cheeks to add a natural flush of color.
- Eyeshadow: Coordinate your eyeshadow with your contouring shades to create a harmonious overall look.
- Lipstick: Choose a lip color that complements your contouring, whether it’s a nude shade or a bold statement color.
Contouring for Different Skin Tones
Contouring techniques can vary depending on your skin tone. Consider these tips when contouring for different skin tones:
- Fair Skin: Opt for cool-toned contours to avoid looking too muddy or orange. Light-handed application is key for a natural finish.
- Medium Skin: Warm-toned contours work well for medium skin tones. Blend carefully to ensure a seamless transition between the contour and natural skin tone.
- Dark Skin: Look for deeper shades with rich undertones to contour effectively. Avoid overly light highlighters, as they can appear ashy on darker skin tones.
Frequently Asked Questions
Yes, contouring can be done with cream-based products, offering a more natural and dewy finish.
Absolutely! Contouring can be tailored to suit everyday makeup looks, ranging from subtle to more pronounced contours.
Contouring focuses on creating shadows and adding definition, while bronzing adds warmth and a sun-kissed glow to the skin.
Yes, contouring can enhance various face shapes by accentuating or softening specific features.
Yes, there are affordable contouring products available in the market that deliver excellent results.
Conclusion
Contouring face makeup is a transformative technique that allows you to sculpt and enhance your features with precision. By understanding the tools, techniques, and considerations for different face shapes and skin tones, you can achieve a flawless contour that accentuates your natural beauty. Remember to start with a light hand, blend meticulously, and customize your contour to suit the occasion and lighting conditions. With practice and experimentation, you’ll master the art of contouring and unlock endless possibilities for enhancing your facial features.