Skeleton face makeup has become a wildly popular trend in recent years, especially during Halloween and costume parties. It offers a unique and eerie look that is both captivating and bone-chilling. If you’re ready to embrace your spooky side and transform yourself into a hauntingly beautiful skeleton, this article will guide you through the process. From the basic tools and products needed to step-by-step instructions and creative ideas, we’ll help you achieve flawless skeleton face makeup that will leave everyone in awe.
Introduction to Skeleton Face Makeup
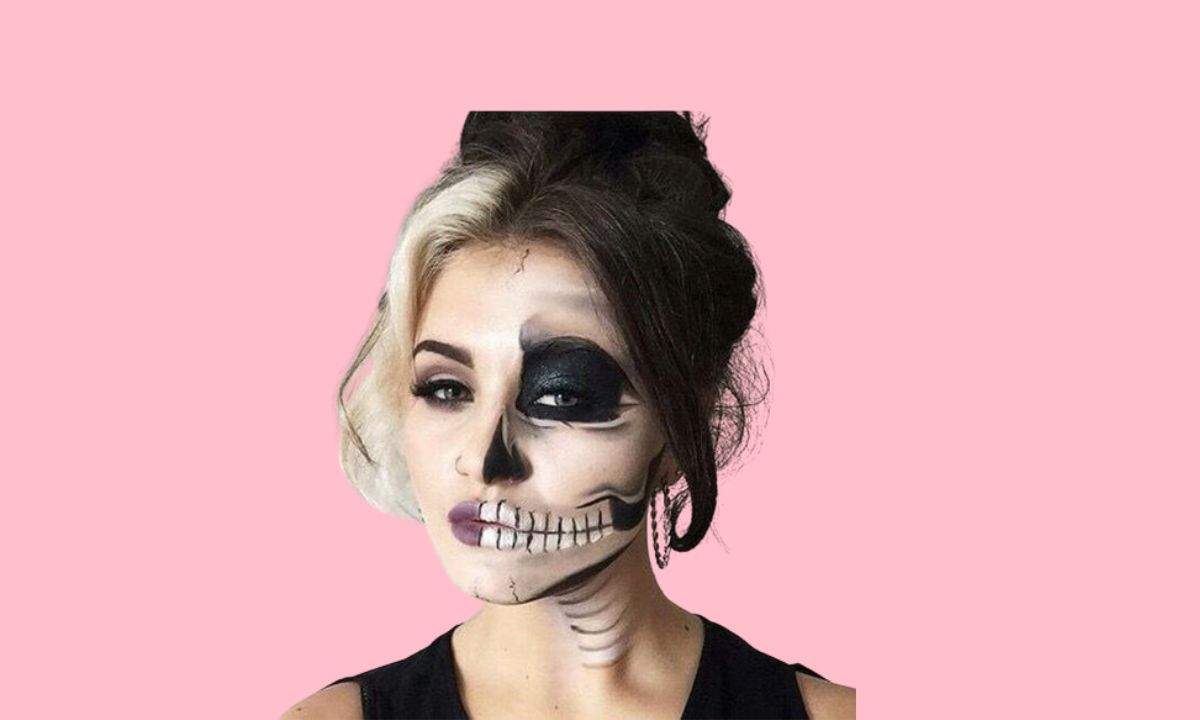
Skeleton face makeup involves transforming your face into a skeletal masterpiece. Inspired by the skeletal structure of the human body, this makeup technique recreates the appearance of a skull on your face. It creates an illusion that can be both striking and intimidating, making it a popular choice for Halloween costumes, themed parties, and artistic photoshoots.
The Popularity of Skeleton Face Makeup
In recent years, skeleton face makeup has gained immense popularity due to its versatility and visual impact. People of all ages and genders are drawn to the allure of this spooky and creative makeup style. It allows individuals to explore their artistic side while making a dramatic statement. The trend has spread across social media platforms, with countless tutorials and inspiration flooding the internet.
Benefits of Skeleton Face Makeup
Skeleton face makeup offers numerous benefits for those looking to transform their appearance. Firstly, it provides a unique and attention-grabbing look that sets you apart from the crowd. Whether you’re attending a Halloween party or a costume contest, skeleton face makeup ensures you’ll be the center of attention. Additionally, this style allows for a high level of creativity and self-expression, giving you the freedom to customize your design according to your preferences.
Tools and Products Required for Skeleton Face Makeup
Before diving into creating your skeleton face makeup, it’s essential to gather the necessary tools and products. Here are some key items you’ll need:
- Face Primer: Begin by applying a face primer to create a smooth canvas for the makeup and to ensure it lasts longer.
- White Face Paint: This will serve as the base color for your skeleton face. Make sure to choose a high-quality, water-based face paint that is safe for the skin.
- Black Face Paint: Black face paint is essential for outlining the skeleton structure and creating shadows and contours.
- Detail Brushes: Invest in fine detail brushes to achieve precision and intricate designs.
- Setting Powder: Apply setting powder to prevent smudging and make the makeup last throughout the night.
- Makeup Sponges: Use makeup sponges for blending and achieving a seamless look.
- Setting Spray: Finish your skeleton face makeup by spritzing a setting spray to lock it in place.
Step-by-Step Guide to Creating Skeleton Face Makeup
Applying a Base Makeup
Start by preparing your face with a clean canvas. Remove any makeup residue, and apply a moisturizer suitable for your skin type. Once your skin is prepped, follow these steps:
- Apply a face primer evenly all over your face to ensure a smooth base.
- Use a makeup sponge or brush to apply white face paint as the base color for your skeleton face. Make sure to cover your entire face, including your eyelids and lips, for a cohesive look.
- Allow the white face paint to dry completely before moving on to the next step.
Outlining the Skeleton Structure
Next, it’s time to create the framework for your skeleton face. This step involves outlining the major features of a skull. Follow these steps:
- Using a thin brush and black face paint, draw the outlines of the eye sockets, nose, and jawline.
- Fill in the eye sockets with black face paint, leaving space for the hollow effect.
- Extend the lines from the eye sockets to create the appearance of sunken cheeks.
- Paint the nose cavity in black and draw lines to mimic the nasal bone.
- Outline the jawline with precision, emphasizing the bone structure.
Adding Shadows and Contours
To achieve a realistic skeleton look, you’ll need to add shadows and contours to enhance the depth. Here’s how:
- With a brush, apply black face paint to the hollow areas of your cheeks, temples, and around the eye sockets. Blend the edges to create a seamless transition between the black and white areas.
- Create depth by adding shadows under the cheekbones, along the sides of the nose, and beneath the jawline.
- Blend the shadows with a clean brush or sponge to soften the lines and create a natural appearance.
Highlighting and Adding Details
Now it’s time to add highlights and intricate details to make your skeleton face makeup stand out. Follow these steps:
- Use a small brush to add white face paint to the high points of your face, such as the cheekbones, bridge of the nose, and forehead. This will create contrast and make the features pop.
- Add fine lines with black face paint to simulate cracks or to create a more intricate design. You can also experiment with dots, swirls, or other patterns to customize your look.
Enhancing the Look with Accessories
To take your skeleton face makeup to the next level, consider adding accessories and props that complement your design. Here are a few ideas:
- Skeleton Hands: Wear skeleton gloves or paint your hands in a skeletal pattern to extend the theme beyond your face.
- Headpieces: Add a crown of flowers, a top hat, or a tiara to enhance the overall look and create a more detailed character.
- Clothing and Accessories: Pair your skeleton face makeup with black clothing or skeleton-printed apparel to complete the spooky ensemble.
Tips for a Flawless Skeleton Face Makeup
- Start with a light hand when applying face paint and gradually build up the layers for better control.
- Use reference images or tutorials for inspiration and guidance.
- Practice your design beforehand to ensure you’re comfortable with the process.
- Don’t forget to blend the colors seamlessly for a more realistic effect.
- Experiment with different brush sizes and shapes to achieve varying line thicknesses.
Safety Precautions for Skeleton Face Makeup
While skeleton face makeup can be an exciting and creative experience, it’s important to prioritize safety. Here are some caution to keep in mind:
- Use high-quality, skin-safe face paints to avoid allergic reactions or skin irritations.
- Conduct a patch test on a small area of your skin before applying the makeup to your entire face.
- Remove the makeup promptly after the event to prevent clogged pores or skin issues.
- Avoid applying face paint too close to the eyes or inside the mouth to prevent discomfort or ingestion.
Removing Skeleton Face Makeup
Removing your skeleton face makeup is as important as applying it correctly. Follow these steps to ensure safe and effective removal:
- Use a gentle cleanser or makeup remover suitable for your skin type.
- Begin by wiping away the face paint with a damp cloth or makeup wipe.
- Gently massage the cleanser onto your skin in circular motions to dissolve any remaining makeup.
- Rinse your face thoroughly with lukewarm water.
- Apply a moisturizer to rehydrate your skin after the removal process.
Skeleton Face Makeup Ideas for Different Occasions
Skeleton face makeup isn’t limited to Halloween. Here are some occasions where you can rock this unique look:
- Halloween Parties: Embrace the spooky season with a hauntingly beautiful skeleton face makeup.
- Cosplay Events: Bring your favorite skeletal characters to life with a detailed skeleton face design.
- Themed Parties: Stand out from the crowd by incorporating skeleton face makeup into themed events like Gothic parties or Day of the Dead celebrations.
- Artistic Photoshoots: Showcase your creativity by capturing stunning photographs of your skeleton face makeup.
- Music Festivals: Add an edgy touch to your festival look with a skeleton-inspired makeup design.
Conclusion
Skeleton face makeup allows you to explore your creativity while embracing the spooky side of life. With the right tools, techniques, and a dash of imagination, you can transform yourself into a mesmerizing skeleton. Whether it’s for Halloween, a themed party, or a personal artistic expression, skeleton face makeup is sure to make a bone-chilling impression. So unleash your spooky creativity and embrace the world of skeleton face makeup!
Frequently Asked Questions (FAQs): Skeleton Face Makeup
Yes, you can use regular makeup products like eyeshadows, face powders, and eyeliners to create your skeleton face makeup. However, face paints specifically formulated for this purpose offer better coverage and longevity.
The time required to create this face makeup varies depending on the complexity of the design and your level of expertise. Simple designs may take around 30 minutes, while more intricate ones can take an hour or longer
While traditional skeleton makeup is done using black and white colors, there are no hard and fast rules. Feel free to experiment with different colors to add a unique twist to your skeleton look.
To prevent smudging and transfer, it’s important to set your skeleton makeup with setting powder and finish with a setting spray. This will help it stay in place and minimize the chances of smudging or transferring onto clothing
To ensure the safety of face paint, always choose high-quality, non-toxic products specifically formulated for use on the face. Perform a patch test on a small area of your skin before applying it to your entire face to check for any adverse reactions.